
PowerPoint can do a lot of things.
Turning text into outlines — like Illustrator “Create Outlines” — is not one of them.
So if you want text that becomes a design element (not editable text), you have to use a workaround.
In this tutorial, I’ll show you how to convert live editable text into an outlined shape using Merge Shapes — and it’s surprisingly easy once you know the trick.
Why would you want outlined text?
Outlined text (aka text as a shape) is useful when:
- You want the text to behave like a graphic object
- You’re designing a logo, title treatment, sticker-style text, etc.
- You want to prevent someone from editing the wording/font
- You’re building a reusable design element in a template
Important: once you convert it to outlines, it is no longer editable as text. You can’t click and type.
So… make sure the text is correct first. 🙂
Step 1: Add your text
- Go to Insert → Shapes
- Choose Text Box
- Click on the slide and type your text
Example (because why not):
Care Bear Stare
Now format it however you want:
- Pick the font
- Increase the size
- Make it bold
- Keep it on one line if possible (easier to work with)
Step 2: Add a “cookie dough” shape behind it
Now we need a solid shape to cut the text out of (think: cookie dough + cookie cutter).
- Go to Insert → Shapes
- Choose a simple shape like:
- Rectangle
- Rounded rectangle
- Oval
✅ Use a shape that easily covers the text
🚫 Don’t use a star or smiley face unless you enjoy unnecessary suffering
- Draw the shape so it fully covers your text
Optional: Make it easier to see what’s happening
- Set a fill color (purple is a vibe)
- Remove the shape outline:
- Shape Format → Shape Outline → No Outline
If your shape is blocking the text, you can send it behind:
- Right-click the shape → Send to Back
This step is purely for convenience.
Step 3: Select the shape first, then the text
This is the most important part, and the step people mess up.
You must select in this order:
- Click the shape (the cookie dough) first
- Then Shift+Click the text (the cookie cutter)
So your selection should include:
- the rectangle shape
- the text box
Step 4: Merge Shapes → Intersect
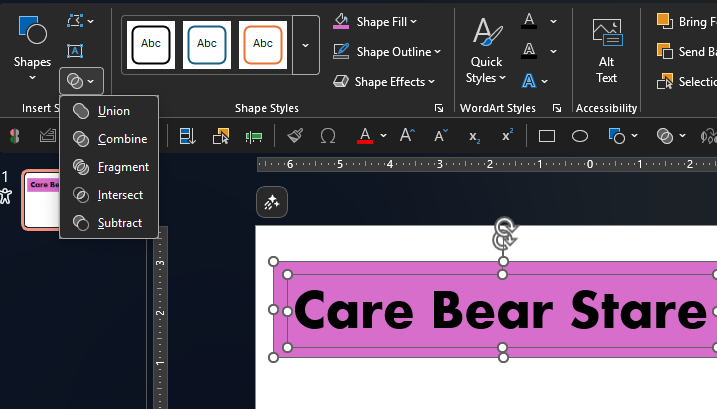
Now the magic:
- Go to the Shape Format tab
- Click Merge Shapes
- Choose Intersect
Boom.
Your text has now been converted into a shape.
Step 5: Confirm it’s a shape (aka no longer editable)
If it worked correctly:
- Clicking it selects one shape
- You can’t highlight letters or edit text
- It behaves like a graphic
Want proof?
Right-click the shape and choose:
✅ Edit Points
If you see a billion little points, congratulations:
You’ve just created a horrifyingly complicated shape. 🎉
(That’s how you know it’s real.)
What you can do with outlined text now
Now that it’s a shape, you can:
- Change fill color
- Add outline strokes
- Add shadows/glow
- Apply gradient fills
- Rotate/warp it like a design element
- Use it as part of a template design
Quick Troubleshooting
“Intersect is grayed out”
That usually means:
- You didn’t select two objects
- One object is not a shape/text box
- You’re not in the Shape Format tab (you need to select a shape first)
“My text disappeared”
Most likely:
- The rectangle didn’t fully cover the text
- The rectangle wasn’t selected first
Undo (Ctrl+Z) and try again.
Recap
Here’s the whole method in plain English:
- Create your text
- Put a simple shape behind it
- Select shape first, then text
- Shape Format → Merge Shapes → Intersect
- Enjoy your new fancy outlined-text shape